Are you tired of reaching into your freezer only to find it devoid of ice? Well, fret no more! Your Vevor ice maker is here to the rescue.
Whether hosting a summer party or simply craving a refreshing beverage, this article will guide you through troubleshooting steps to get your ice maker back in action.
We’ve covered you, from addressing cooling concerns to identifying and resolving ice quality issues.
Say goodbye to iceless woes and hello to an endless supply of ice-cold goodness!
Understanding Ice Production Issues With Your Vevor Ice Maker
If your Vevor ice maker is not making ice, there are a few things you can do to troubleshoot it.
First, check the level adjustment switch.
This switch makes sure that the ice maker produces enough ice. If it is too low, it may be stopping ice production. Adjust the switch to the right level and see if that fixes the problem.
Next, clean the evaporator plate. Over time, minerals or scales can build up on the plate and slow down ice production. Use a soft cloth or sponge to gently remove any buildup.
Also, check the water supply line for kinks or leaks that may be blocking the water flow to the ice maker. If you find any kinks, straighten them out. If you notice any leaks, repair them as needed.
Why Won’t My Vevor Ice Maker Make Ice?
There could be several reasons why your Vevor ice maker is not making ice. It could be related to the wiring, the water valve may be defective, or an issue with the ice maker assembly.
If your bin is not full and the machine is not producing ice, it might be one of these issues. To diagnose the exact problem, it is advisable to get the help of a qualified technician.
Do I need to Replace the Water Valves on my Vevor Icemaker?
If your Vevor icemaker is not making ice, you may need to replace the water valves. A defective water valve can affect the water entering the ice maker, preventing it from producing ice. Also, a damaged valve can cause water to leak from the machine.
Addressing Cooling Concerns in Your Vevor Ice Machine
To address cooling concerns in your Vevor ice maker, check the condenser coils for dust, dirt, or debris that may hinder heat transfer.
These coils release heat and maintain the optimal temperature for ice production. If they are clogged or dirty, the cooling efficiency of your ice maker can be compromised.
Regular maintenance is essential to ensure the proper functioning of your Vevor ice machine.
In addition to cleaning the condenser coils, inspect the water line for any kinks or leaks that may disrupt water flow.
Check for any water supply problems affecting the ice maker’s performance.
Also, clean the evaporator plate to remove mineral deposits or scale buildup that may impact cooling.
By addressing these cooling concerns and performing regular maintenance, you can ensure that your Vevor ice maker operates at its best and continues to produce high-quality ice.
Investigating Excessive Ice Production in Your Vevor Ice Maker
Investigating excessive ice production in your Vevor ice maker can help you identify potential performance issues.
Start by inspecting the temperature settings of your appliance. Ensure that it is operating at the correct temperature to produce ice effectively.
Next, check the water supply to your ice machine. Ensure there are no leaks or issues with water pressure that could be causing excessive ice production.
Additionally, inspect the evaporator for any dirt or blockages hindering the ice-making process.
Lastly, check the ice storage to ensure it is not overfilled or obstructed.
Identifying and Resolving Ice Quality Issues in Your Vevor Ice Maker
Identifying and resolving ice quality issues in your Vevor ice maker involves key steps.
First, ensure proper ventilation around the machine to allow for optimal airflow.
Regularly maintain and replace water filters to prevent impurities from affecting the ice quality.
Check the temperature and flow rate settings to ensure they are set correctly for efficient ice production.
Additionally, inspect the water inlet valve for any clogs or faulty parts hindering the water supply.
A blocked water supply can directly impact the quality of the ice.
What Can Cause My Vevor Ice Maker to Make Noise?
Unusual noise can be a common issue with your Vevor Ice Maker. The noise might indicate a problem with the motor, a jam within the ice maker assembly, or a faulty water valve. Noise can also be caused by improper installation or setup.
Troubleshooting Water Leaks in Your Vevor Ice Maker
If you notice water leaks in your Vevor ice maker, check all parts of the condenser unit and water lines for loose or improperly installed hoses. Loose or improperly installed hoses can cause leaks and disrupt the water flow in your ice maker.
Start by inspecting the condenser unit and ensure that all hoses are securely connected. Check the water supply line for any cracks or damage causing the leak. Additionally, examine the tray and ice cube tray for any signs of leaks or overflowing water.
If you have a water filter in your ice maker, make sure it is properly installed and not clogged, as a clogged filter can also cause leaks.
Can I Repair My Vevor Ice Maker Myself?
While some simple DIY repairs can be done, it is often better to hire a professional technician when dealing with more complicated issues.
However, if the problem is simple, such as needing to defrost the unit or adjusting the amount of water going into the ice maker, those can be done at home.
Always ensure you have the correct knowledge before undertaking any repair.
5 Steps for Effective Cleaning and Maintenance of Your Vevor Ice Maker
To effectively clean and maintain your Vevor Ice Maker, you should follow several key steps.
First, use a neutral detergent to clean the shell of the machine.
Second, make sure to check and replace the filter element regularly.
Third, it’s important to flush the water tank and ice storage bucket using a water pipe.
Lastly, don’t forget to clean the air-cooled ice machine condenser every quarter.
These maintenance tasks will help ensure the optimal performance and longevity of your Vevor Ice Maker.
Neutral Detergent Cleaning
Use a neutral detergent to clean the shell of your VEVOR ice maker. Cleaning the shell regularly is essential to ensure your ice maker’s efficient operation and longevity.
Here are three important steps to take when using a neutral detergent for cleaning:
- Check the water supply: Make sure the water supply to your ice maker is sufficient and free from any blockages. Low water pressure can affect ice production, so it’s important to maintain the recommended water pressure range.
- Inspect the ice bin: Remove the ice bin and check for any debris or buildup that may obstruct the water flow to the ice. Clean the ice bin thoroughly to ensure a steady supply of ice.
- Replace the water: Regularly replace the water in the ice maker to maintain its cleanliness and prevent contaminants from affecting the ice quality. This will ensure that you always have clean and fresh ice for your needs.
Regular Filter Replacement
Regularly replacing the water filters is essential for maintaining the efficiency and quality of your VEVOR ice maker. Over time, the water filters in your ice maker can become clogged with impurities, affecting the taste and clarity of your ice cubes.
Additionally, dirty filters can cause issues with the water flow, leading to decreased ice production or even a malfunctioning ice maker. To diagnose if your water filters need replacement, check for any signs of reduced water flow or poor ice quality. If you notice any of these issues, it’s time to replace the water filters.
Water Tank Flushing
If your VEVOR ice maker is not making ice, one possible cause could be a buildup of debris or mineral deposits in the water tank. Flushing the water tank can help resolve this issue. Here are three steps to take:
- Turn off the ice maker and unplug it from the power source.
- Locate the water inlet valve and shut it off to stop the water flow.
- Empty the water tank by draining it completely. Then, fill the tank with warm water and mild detergent. Let it sit for a few minutes to loosen any buildup.
- Use a soft brush or cloth to scrub the interior of the water tank, removing any residue or debris.
- Rinse the tank thoroughly with clean water to remove any remaining detergent.
- Open the water inlet valve and turn on the ice maker to allow fresh water to fill the tank.
- Monitor the ice maker to see if it starts producing ice again. If not, other issues may require further troubleshooting or professional assistance.
Ice Bucket Cleaning
To ensure clean and hygienic ice production, start by emptying the ice bucket and scrubbing it with warm water and mild detergent.
Remove any ice residue and rinse thoroughly to eliminate any lingering soap.
Inspect the ice bucket for any cracks or damage that may compromise its integrity. If you notice any cracks, promptly replace the ice bucket to prevent water leakage.
After cleaning, dry the ice bucket completely before placing it back into the ice maker. Remember to clean the ice storage bin regularly to prevent the growth of bacteria. Insufficient cleaning of the ice bucket and storage bin can lead to contamination and affect the quality of the ice produced.
Condenser Quarterly Cleaning
Ensure the condenser coils are thoroughly cleaned every three months to maintain optimal ice maker performance.
Cleaning the condenser coils is essential in preventing the ice maker from experiencing issues and ensuring it keeps working properly.
To clean the condenser coils, disconnect the water line from the ice maker and turn off the power to the refrigerator.
Use a vacuum cleaner or a soft brush to remove any dust, dirt, or debris from the coils. Be gentle to avoid damaging the coils.
Once the cleaning is complete, reconnect the water line and allow water to flow freely before turning the power back on.
Regularly cleaning the condenser coils will help maintain the optimal performance of your ice maker and ensure a steady supply of ice.
Guidance on Adjusting Ice Block Thickness and Taking General Precautions With Your Vevor Ice Maker
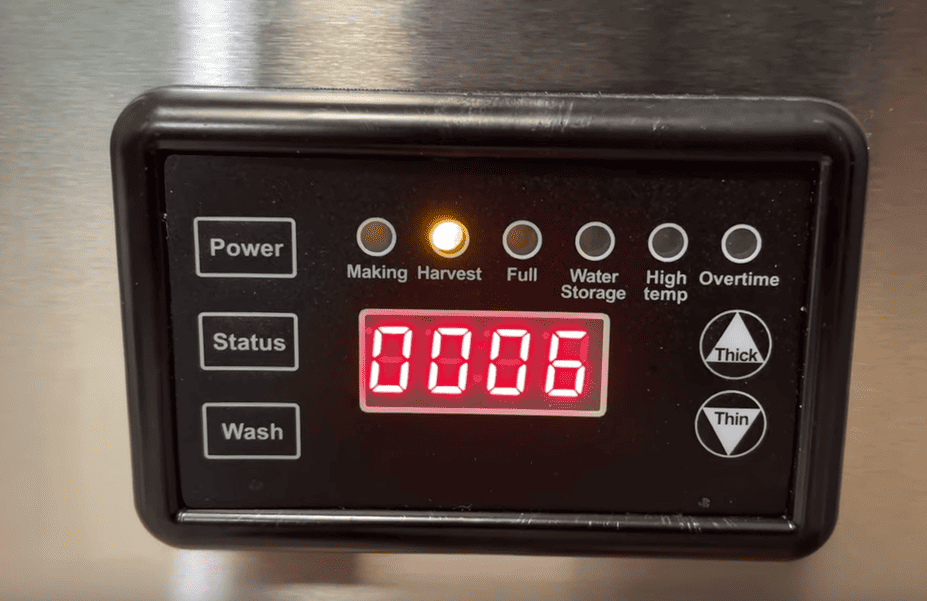
When adjusting the ice block thickness on your Vevor ice maker, observe the adjustment effect after completing the de-icing process. This is essential to ensure optimal ice production and quality.
To adjust the ice block thickness, locate the control panel on your ice maker. Press the appropriate buttons to increase or decrease the thickness setup of the ice block. Remember to consider the ambient temperature when making adjustments.
After de-icing, observe the ice production to determine if the desired thickness has been achieved. If necessary, make further adjustments until the desired result is obtained.
Additionally, to maintain the performance of your ice maker, it is crucial to ensure proper cleaning of the condenser coil, fan motor, and compressor inside the unit. Regular cleaning, good water quality, and proper maintenance will help prevent issues such as water freezing or reduced ice production.