If the water and ice dispenser on Whirlpool refrigerator is in need of cleaning, you may be experiencing dirty and strange-tasting ice or water. Moreover, you are also at risk of contracting some illnesses, as dirty water is an ideal breeding ground for bacteria and other harmful pathogens. Your dispenser’s performance may also be compromised and may even result in a breakdown.
Whether buying a new appliance or looking for ways to ensure proper upkeep of your current one, you must incorporate cleaning as a vital maintenance protocol. For the novice user cleaning an ice and water dispenser may seem like an overwhelming task. However, in reality, it is quite simple, and you can do it on your own in a few easy steps.
Read this detailed guide to learn how to clean water and ice dispenser on Whirlpool Refrigerator.
How to Clean Water and Ice Dispenser on Whirlpool Refrigerator?
The cleaning of the Whirlpool ice and water dispenser process may take around 45 minutes to an hour, and you need very few tools for the purpose. Before you begin, turn off your refrigerator and remove the socket’s plug to keep yourself safe from electrocution during cleaning.
Once the appliance is turned off, turn off the water supply and remove the refrigerator’s drip tray. Now remove the dispenser’s light bulb and put it in a safe place. Here are the steps you must follow.
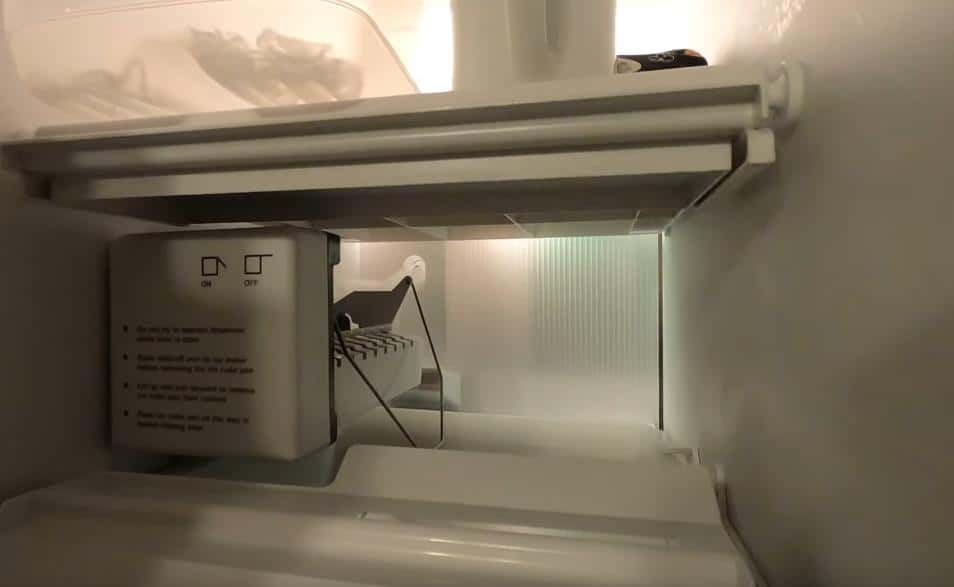
Remove and disconnect the panel cover and other components from the front
To get to the inner part of the dispenser, you must first remove the front panel surrounding the opening of the dispenser. It is attached to a frame screwed onto the door of the refrigerator. To remove the panel, you will need to push down the panel’s bottom from the inside of the opening and push one side away simultaneously. However, be gentle while removing and avoid using excessive force.
You need to disconnect the panel by disengaging the wiring once the panel comes off. The panel is hinged to the wiring via a plug, and you can use a screwdriver to unlatch the connector. Pull gently at both ends and remove the panel once it comes off completely.
To gain access to the dispenser’s upper section, you will further need to remove the part that holds the dispenser switch. It is held by two screws, and you can easily remove them with the screwdriver.
Next, you will need to dislodge the dispenser nozzle and spring, for which you will need to remove two more screws.
Once the spring holding the dispenser levers in place is removed, remove the water dispenser lever first by tipping it out and then downwards. Now slide it around the nozzle to get it out of the way.
Next, you must remove the ice lever by disconnecting the ice door damper’s rubber boot. Open the ice door and feed the lever around the damper and door.
Now all the requisite parts have been removed, and you have clear access for thoroughly cleaning the inside of the dispenser.
Clean the ice and water dispenser
To clean the ice and water dispenser, soak the components in a solution of three parts water and one part vinegar. Vinegar is a great natural cleaner that can help disinfect the dispenser besides cleaning it effectively.
You can add a teaspoon of baking soda and a few drops of tea tree oil to the cleaning solution for better results. This will help remove the lime and scale buildup in the dispenser. Once cleaned, rinse the parts under running water.
Use a wet sponge or damp cloth to clean the refrigerator, particularly the area around the dispenser, and do not forget to clean the dispenser tray as well. It collects dirty water and bacteria and may become a breeding ground for mold and bacteria if not cleaned properly.
To clean the dispenser nozzle, you may need to use a toothbrush dipped in the cleaning solution.
Once done, rinse it and set it aside to dry. Now use a compressed air can to remove any dirt from the point where the nozzle meets the refrigerator. Overlooking this step may block water from coming out properly.
How to clean mold from the Whirlpool water ice dispenser?
Prolonged contact with water can lead to mold growth in the dispenser’s reservoir, and the best way to get rid of it is to use vinegar or bleach and water solution comprising one part of bleach or vinegar mixed with three parts water.
Pour the solution into the reservoir and let it sit for fifteen minutes.
Once the time has passed, remove the solution, wipe away the remaining mold with a sponge or cloth, and rinse out with water thoroughly to remove mold or cleaning solution residue.
Reassemble the dispenser components
Once everything is cleaned, rinsed, and dried, it is time to reassemble the parts.
Follow the steps taken to disassemble the dispenser components in reverse order to put the pieces back in properly.
You must ensure that the top is aligned with the score when hinging the screws for the switch assembly.
Reconnect the wiring to the front panel cover and press it firmly into place while ensuring that the wires are not pinched.
Now plug your refrigerator back in the socket and turn it on. Test the ice and water to ensure the taste is fresh.
Your Whirlpool water and ice dispenser is now safe and ready for use.
How often to clean the water and ice dispenser on Whirlpool refrigerator?
Regularly cleaning the water and ice dispenser on your Whirlpool refrigerator helps ensure you consume safe and fresh water and ice, preventing the buildup of dirt, mold, or bacteria. It also helps keep your dispenser running smoothly.
To ensure it stays clean, you must clean it at least once every six months or sooner if required.
For instance, if the Whirlpool refrigerator ice dispenser is not working properly, is producing less ice, or the water and ice have a weird appearance, taste, or smell, it indicates that the dispenser must be cleaned right away.